Configuring Raspberry Pi for Linux Kernel Development
Raspberry Pi is a Linux based single board computer. It can be configured to be used as a Linux Kernel Development or Linux Device Driver Development tool. Raspberry Pi can be confirmed easily learning tool for kernel development.
1. Why Raspberry Pi for Kernel Development?
Well this would be first question that would pop up in your head isn’t it? Shouldn’t I be using my safe virtual machine setup for learning kernel development. Well basically you could but you would be missing out all the fun that actual hardware has to offer you.
There are several advantages of using RPi as you kernel development tool. Firstly, you are working on a actual system with all the real hardware which won’t be the case if you are using a virtual machine setup. Secondly you have access to all the tools that you would use on an Linux workstation.The thing that I like about using Raspberry Pi for kernel development is that you can do all you experiments safely.Safely in the sense all that you are putting at risk is the current installation in cases when you mess the system badly, you can get the system back to a known state using OS image backups. Now imagine the chaos that would ensue when you crash you workstation with all you data.
Kernel developers keep a sacrifical system for their development in case things went south. Here comes in Raspberry Pi, your own inexpensive sacrificial development system. Follow along for steps on how to configure a Raspberry Pi for kernel development.
2. Configure Raspberry Pi for Headless Mode
- I am using Raspberry Pi 3B+ for my kernel development setup.
- Download Raspbian Buster Lite Minimal image based on Debian Buster. The image I downloaded was released on 2020-02-13 (434 MB) and I burned it on a 32GB sd card. Personaly I use SD Card Formatter and Win 32 Disk Imager for creating sd cards for Raspberry Pi, you can use any other tool you are comfortable with.
- Add empty
sshfile in the sd card to enable ssh on boot. This would make sure you can remotely access your raspberry pi i.e. your development system. - Find IP address of the raspberry pi to gain shell access. You can use Advanced IP Scannerfor finding the RPi in your network.
3. Setup Time Zone and Time
This is needed as network operations need system time to be proper, eg. for installing some package.
sudo timedatectl set-timezone Asia/Kolkatasudo date -s "11 Feb 2020 20:00"
4. Update your distribution
sudo apt-get update
5. Install Kernel Headers
sudo apt install raspberrypi-kernel-headersYou need the kernel headers as during kernel development process you will be including these header files. They need to be the ones with which the your kernel was orignally built.
6. Test setup by compiling Hello World Kernel Module.
- GCC is usually installed by default in Raspbian distributions.
Save the following as
hello.c#include <linux/module.h> /* Needed by all modules */ #include <linux/kernel.h> /* Needed for KERN_INFO */ #include <linux/init.h> /* Needed for the macros */ MODULE_LICENSE("GPL"); MODULE_AUTHOR("Suyash Singh Bitti"); MODULE_DESCRIPTION("Hello World Lodable Kernel Module"); static int __init hello_start(void) { printk(KERN_INFO "Hello World Kernel Module \n"); return 0; } static void __exit hello_end(void) { printk(KERN_INFO "Bye.!\n"); } module_init(hello_start); module_exit(hello_end);Save the following as
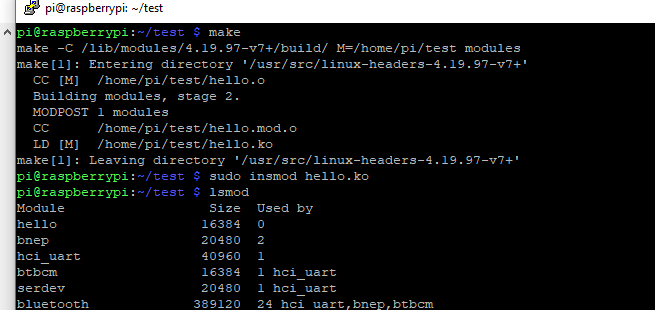
Makefile. Make sure you are using tabs for indentation and not spaces.obj-m = hello.o all: make -C /lib/modules/$(shell uname -r)/build/ M=$(PWD) modules clean: make -C /lib/modules/$(shell uname -r)/build M=$(PWD) cleanCompile the module by running
make
- Open one more terminal and run
tail -f /var/log/kern.logto have a look on the kernel logs.-foption tellstailto show changes in the file at realtime. This way you won’t have keep checking the logs yourself. - Load the kernel module:
sudo insmod hello.ko - Check if your module is loaded into the kernel by running the
lsmodcommand. - Remove the module once you have stared it long enough.
sudo rmmod hello - You would see kernel logs similar to this:

7. Install & Configure GIT
- This step is optional.
sudo apt-get install gitgit config --global user.name "Suyash"git config --global user.email "suyash@example.com"git config --global core.editor nano
These steps should configure your Raspberry Pi for initial linux kernel development.
Sources
- Installing Kernel Header in RPi, Official Guide
- Useful Raspberry Pi forum thread for installing kernel headers using rpi-source. Refer to Dougie’s answer on this thread to use rpi-source.

Hi, I'm Suyash! I'm an Embedded Software Engineer. I work on Linux Device Drivers, Linux System Programming, Embedded System Design. You can know more about me here.